

Setting Up Quickbooks Online
Small business owners and independent contractors are often tasked with doing their own bookkeeping and accounting. For some of the less math-skilled and tech-savvy folks out there, this can be a real challenge. Luckily, Intuit’s Quickbooks accounting software package is available to help.
Arguably the best software of its type, Quickbooks allows entrepreneurs and freelancers to track personal expenses, perform invoicing, manage cash flow, and more, without the need of a CPA. Then–come tax time–they can pull up their Quickbooks data and use it to fill out their tax return with ease, or even import it right into Turbotax, another Intuit product.
However, all of the features and customizability of Quickbooks can make using the software daunting for beginners, and while there’s always customer support, you don’t want to keep emailing representatives back-and-forth just to get a knack with the program.
Don’t worry, we’re here to help. This guide will explain how to get started with Quickbooks Online, the online version of the most popular accounting software for small business owners.
QuickBooks Online is a fairly user-friendly service, but the initial set up can feel intimidating. With our assistance, you’ll be a QuickBooks pro in no time.
Step 1: Enter your business details
Once you sign up, you’ll immediately be taken to the Set-Up Wizard.
The first screen will prompt you to add your company’s basic information, including name, address, and phone number. Be sure to double-check this information, since it’s what will be displayed on all of your invoices.
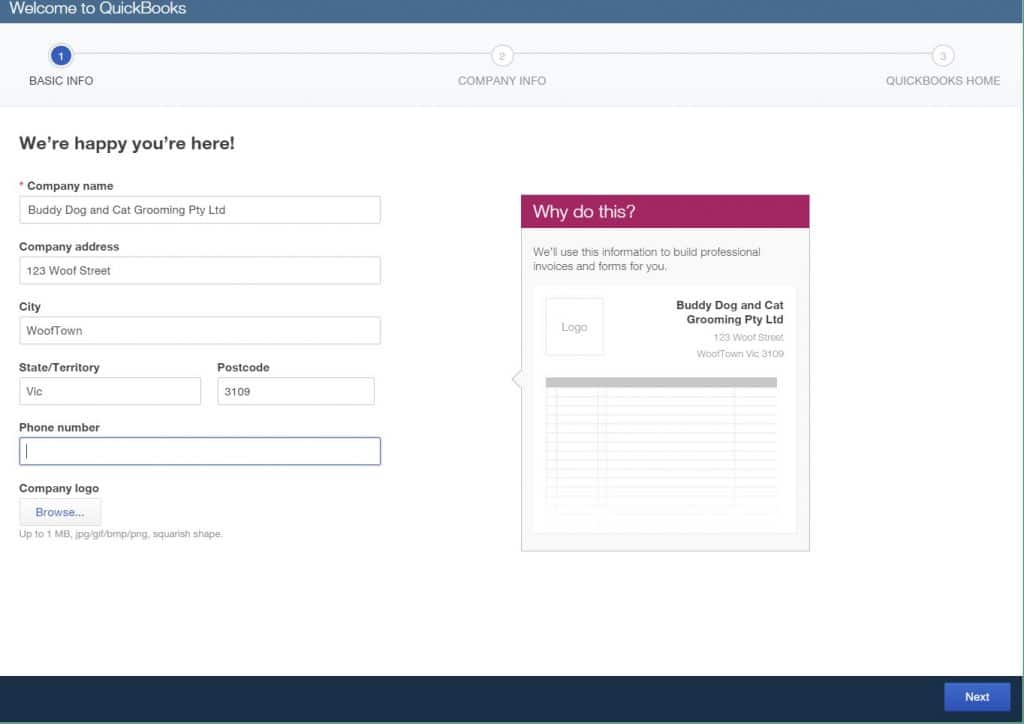
You can also add a logo if it’s in a square format, which we highly recommend for brand awareness purposes.
As you keep clicking Next you’ll add in things like:
- Industry type
- Company type
- Payroll details
What you select will help to customize options and settings for your industry. There are a lot of variables that QuickBooks needs to analyze. For instance, does your business collect sales tax on most transactions, or are you in a sales tax-exempt industry?
During this process, you’ll also be able to explore any extra features you may wish to add. For instance, you may want to add live support with a QuickBooks online accountant or bookkeeper (Quickbooks Live), or you may wish to add support for payroll (QuickBooks Online Payroll). There are many optional add-ons available, each with their own monthly fee.
In addition to all of the aforementioned information, you’ll also be asked if you want to import data from another QuickBooks version.
Handy Tip: You have the option of allowing QuickBooks to send you marketing material from time to time. You can opt-out of this if you want.
Step 2: Set up your chart of accounts
Have your chart of accounts ready on a piece of paper or in a different window, to ensure you don’t miss anything. It should include:
- Bank accounts
- Credit card accounts
- Assets
- Liabilities
- Income
- Cost of goods
- Expenses
- Accounts payable
- Accounts receivable
- Any other relevant accounts to your business
Pressing on the Accounting tab will open your Chart of Accounts. This gives you a pre-filled version to work with. You can easily change or delete whatever is necessary so that it matches your list.
After clicking on New you’ll adjust the following details:
- Category type
- Name
- Description
- Subaccount
- Balance
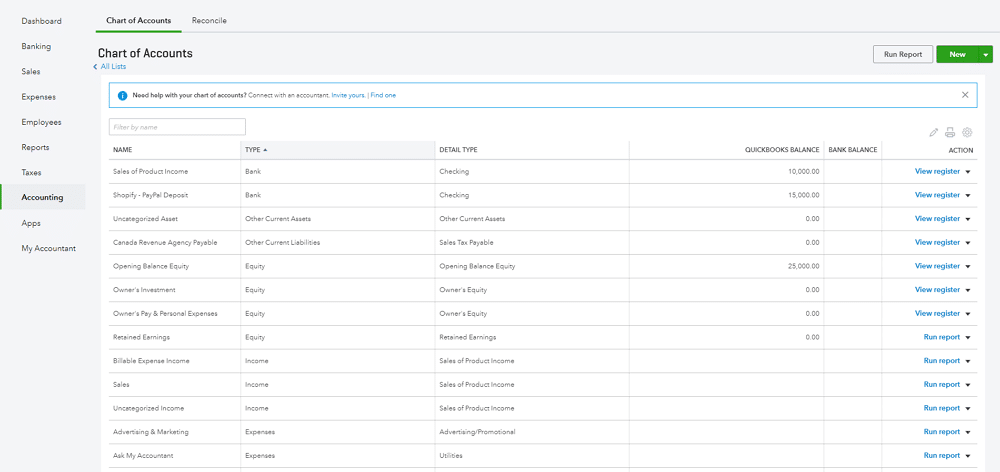
Be sure to double-check that everything is correct before clicking Save.
Step 3: Connect your bank accounts
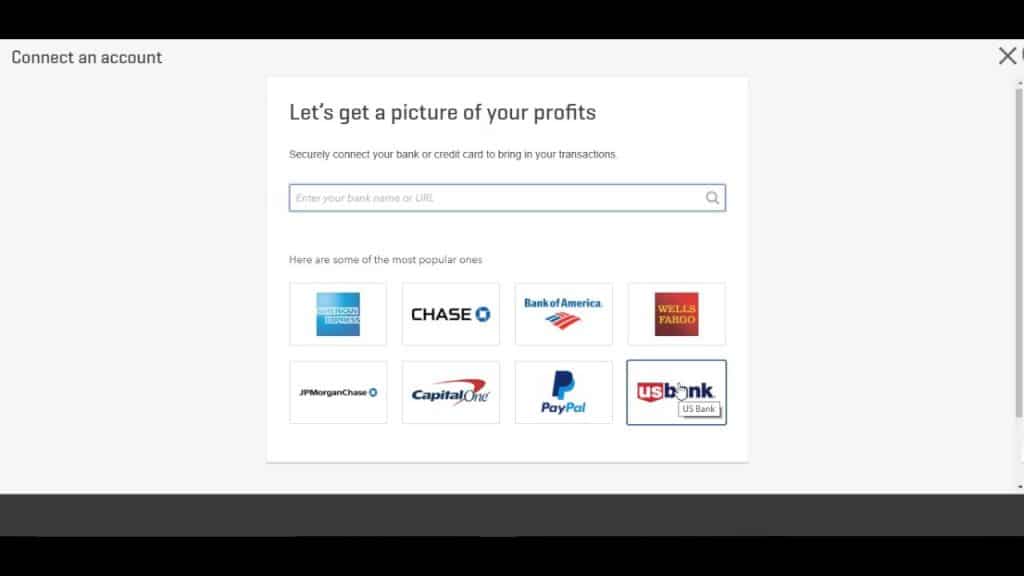
This feature is quickly accessible via the link on the far right of your dashboard:
- Click on Connect Accounts
- Pick your bank from the included list (or type in the URL)
- Sign in to your online account using bank credentials
- Pick which accounts you want to connect (select only the accounts that are related to your business)
- Match each bank account to a listed account on your chart of accounts
Having your bank accounts connected helps with bank reconciliation and automated tracking of transactions. While it may be nerve-wracking to enter your bank account login information, you can rest assured: Intuit Quickbooks is the industry-standard account software, and has the latest security and encryption features.
A Quick Note on Importing Transaction History – QuickBooks Online has an automatic feature of importing 90 days of accounts. If your business has been operating longer than this you need the information in your books. You’ll have to add them manually or via an Excel (CSV) file.
Step 4: Create your invoice template(s)
To add a professional feel to your invoices, you should customize your invoice template. These settings can be accessed via Custom Form Styles, found in Settings under the Company tab.
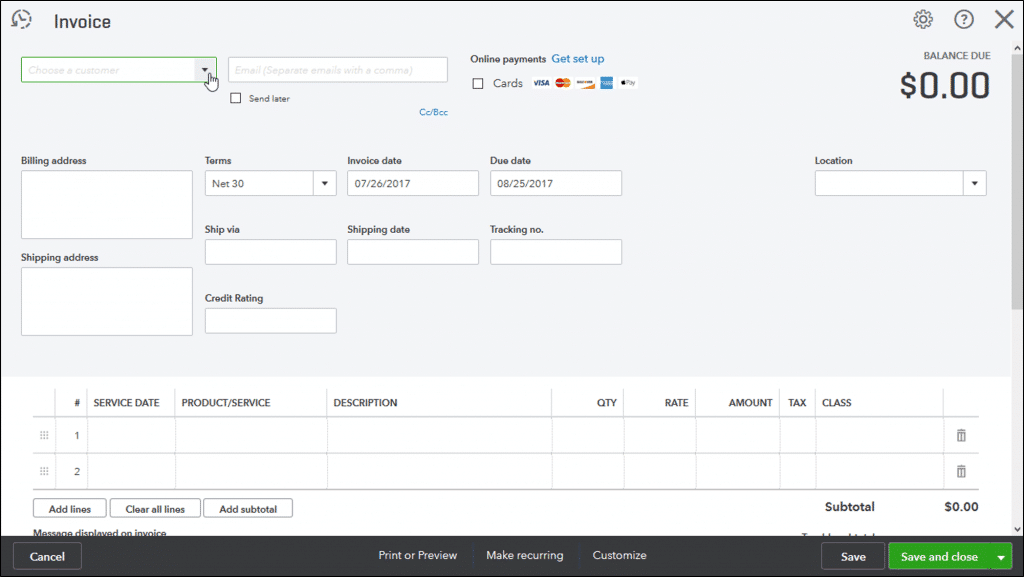
QuickBooks Online provides you with templates, and the following aspects are customizable:
- Logo
- Color scheme
- Font
- Margins for printing
- Content (headers, activity section, footer section)
- Info to accompany an emailed invoice
You can also customize several different invoice designs if you’d like. QuickBooks Online lets you create different versions of invoice templates.
Step 5: Add your products and services
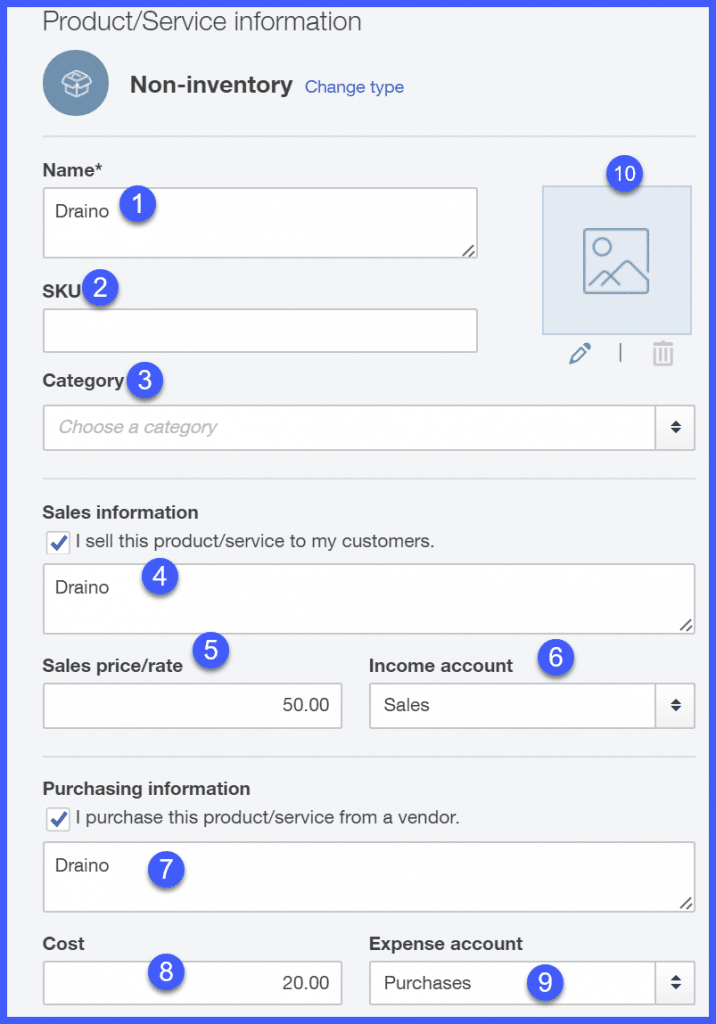
This step is extremely important since it forms the foundational backbone of how you’ll organize your business. It’s also what customers will see on documentation like your invoices. As such, take your time as you’re setting everything up. Checking for spelling mistakes, so that everything looks professional.
Add your products or services via the Lists feature under Settings. Add more by using New, and then insert the following details:
- Type of product or service
- Name
- SKU
- Photo
- Category
- Sales information
- Income account
Remember to hit Save for each one.
You need to go through the following steps for each one, which you’ll see after clicking on the Sales Button:
- Turn on the Show Column on Sales & Purchase Forms if you want Quickbooks Online to add the information to billing documents
- If you use SKUs, you can activate the Show SKU Column on Quickbooks Online Products & Service Forms. It’s unnecessary if you use other methods.
- If you use Quickbooks Online to track inventory, turn on the Quantity and Price Tracking feature
- You can have Quickbooks Online track available stock by switching on the Track Inventory Quantity tab
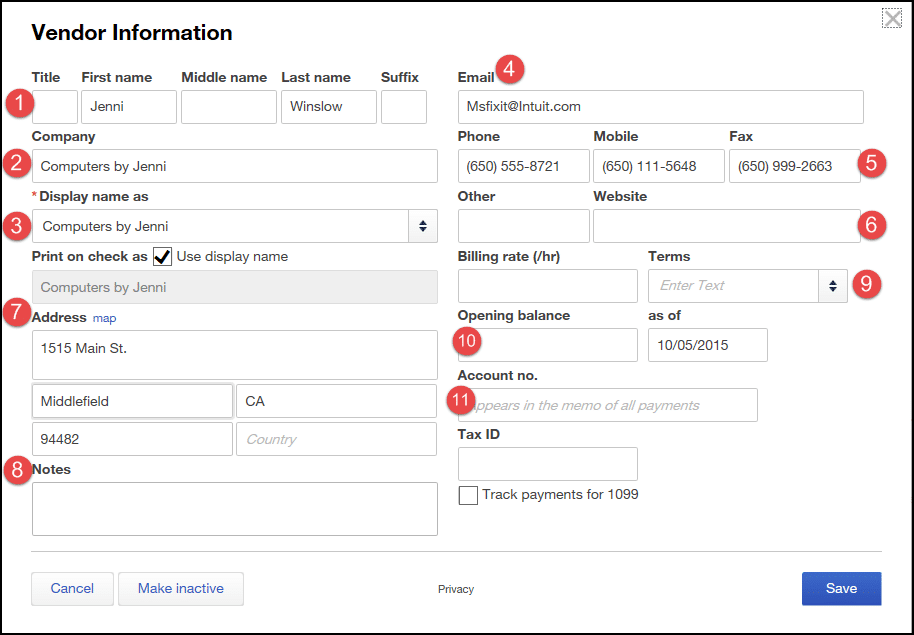
Step 6: Set up customers and vendors
Note that QuickBooks has an Import function. If you have multiple customers or vendors to add, you can place this information in an Excel spreadsheet. Then use the Import Features option found in the drop-down menu. This function will even help you map the data so that the Excel columns’ data is allocated correctly.
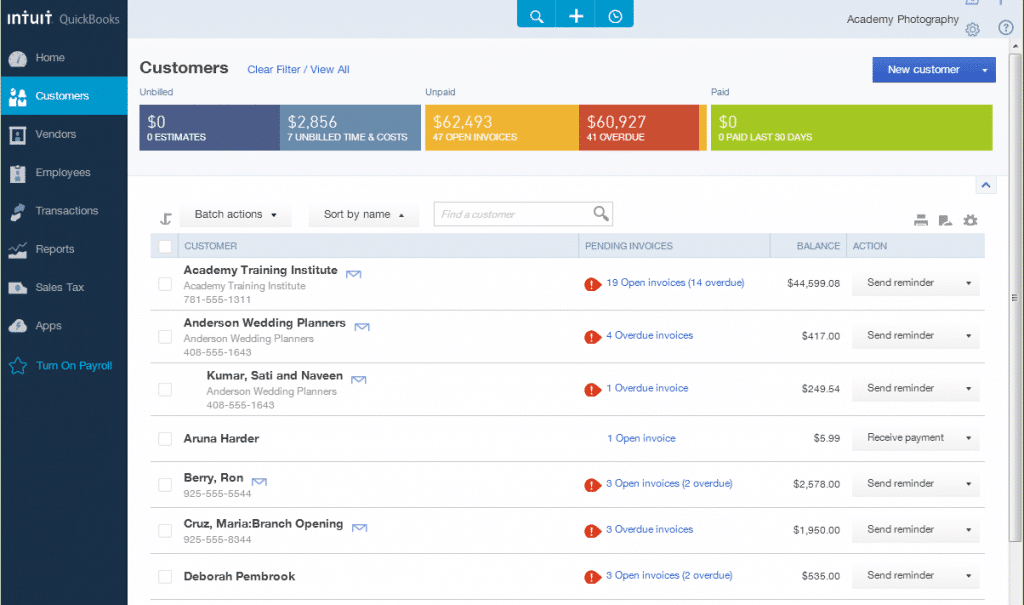
If you’re doing this manually, navigate to the relevant tab, which can be found under Home on the menu on the left of your dashboard. Whether you’re working with Customers or Vendors, the steps are similar:
- Choose to add a new item
- Populate the various fields that QBO provides
- Customer or Vendor details
- Billing information for customers
- Payment methods for vendors
- Review everything for accuracy before saving it
Handy Tip: You need a tax ID number in order to generate 1099 forms and if you add credit card details of customers, make sure it’s accessible by trusted employees only.
Step 7: Create your statements
The Statements feature helps you improve cash flow as you’ll provide customers with overviews of outstanding payments. The QuickBooks system offers three options of displaying the data in financial reports:
- Each transaction can be on a single line, mostly stating invoice totals
- You can list transactions and detail lines, containing data of what was purchased
- You can show an aging table, which will appear at the bottom of the page. You can even add this to your invoices.
Step 8: Learn about additional features
QuickBooks offers a huge array of useful features to meet the business needs of all types. If you want to learn QuickBooks in-and-out, it’s time to explore all the various features. You can simply explore the software on your own, or use QuickBooks training materials found online.
Messaging
Accounting isn’t only about managing finances, but managing relationships with vendors and customers. Adding a personal touch is important, which makes it vital to customize the messages that will accompany emailed invoices or other documents.
Quickbooks Online provides easy to use tables to enter relevant information, including:
- Greetings
- Sales forms that the specific message should be used for
- Subjects
- Custom messages
- Which addresses should be used when messages are sent
Multiple users
You’re not the only one who will benefit from QuickBooks – it will make it easier for employees, bookkeepers, and your accountant to manage tasks too. But you must add them to the system first via the Manage Users button.
Invite your accountant simply by using his or her email address and selecting the Invite Accountant button. They can then create their own user IDs and will have the rights of Company Administrator so they can do things like close your books.
Other users in your company can be added by using the New button. You can then allocate responsibilities like:
- Regular or custom user
- Company administrator
- Reports only
- Time tracking only
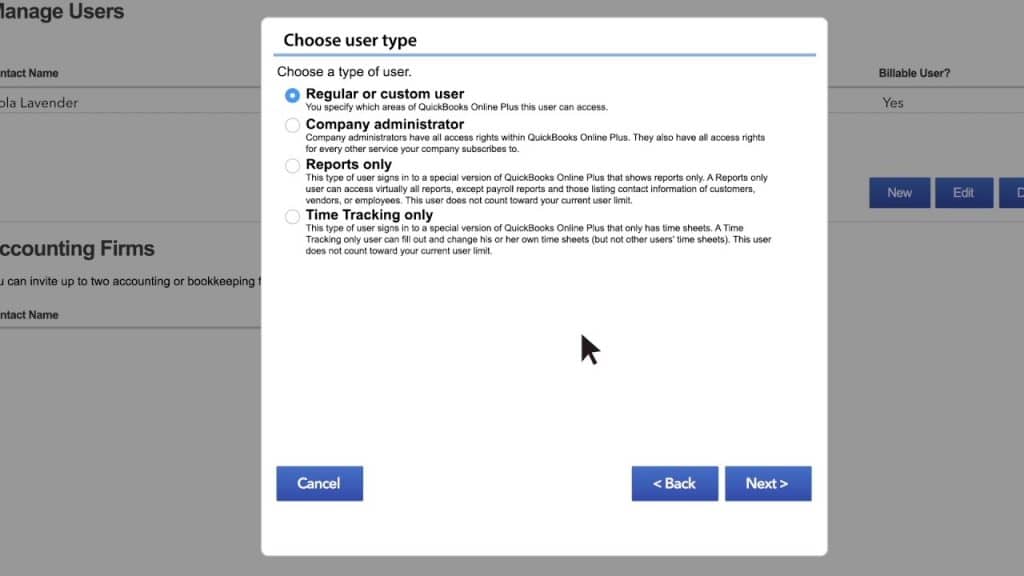
You may also pick a type and set individual user parameters, covering access rights and administrative rights.
Once again, you’ll simply invite people via their email address.
Learn more about QuickBooks Online
Want more information about QuickBooks Online? We have many useful QuickBooks resources on our website:
- QuickBooks Online review gives more information on all the features and reviews the popular business software
- QuickBooks Shortcuts and Tips gives useful tips-and-tricks to become a QuickBooks Online pro
- Introduction to QuickBooks gives an overview of the different versions of QuickBooks (Online, QuickBooks Desktop, QuickBooks Self-Employed, etc.), and helps you choose which one may be best for you
You can also find QuickBooks online tutorials on the internet that will help walk you through specific features of the software. Intuit offers a number of online video tutorials for free. For more in-depth training, you can check out detailed, pre-recorded Intuit QuickBooks webinars. You can even find paid online course material if you really want a deep-dive into QuickBooks, but for most people, this won’t be necessary.