

Setting up QuickBooks Self-Employed
QuickBooks is the most popular accounting software for small businesses. While many businesses scrape by with basic bookkeeping or Excel spreadsheets, most self-employed people can benefit from software like QuickBooks.
For one-person businesses, Intuit QuickBooks Self-Employed (QBSE) is generally the best option.
Note that for small business owners with employees, QuickBooks Online is likely a better option (see our comparison guide here).
This software is specifically tailored to the needs of freelancers, independent contractors, gig-economy workers, and other self-employed individuals. It provides useful tools for bookkeeping, time tracking, preparing for quarterly taxes, invoicing clients, collecting sales tax, tracking profit and loss, preparing a tax summary, and more.
For even more features, you can opt for a Tax Bundle that includes access to Intuit TurboTax. The two software integrate seamlessly, making tax time and end of the year analysis much easier. This combo will help you prepare for tax filing requirements while managing a budget for both federal tax and state tax obligations.
The article below provides a quick start guide to learn how to use QuickBooks Self-Employed (QBSE) efficiently and accurately. We’ll help guide you through the initial setup, introduce you to various accounting tools that the software offers, and explain how QuickBooks can help you gain better control of your business finances.
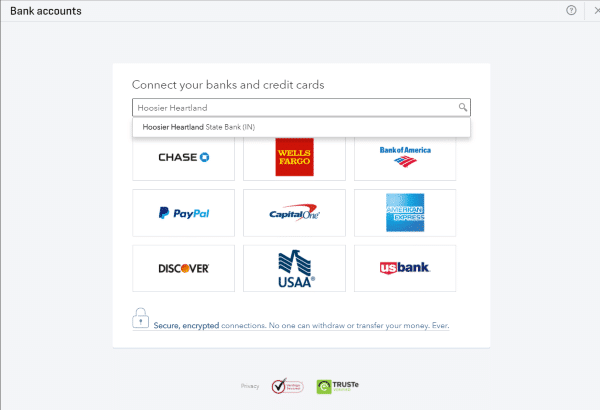
Step 1: Sync your bank accounts
You’ll access the bank portal on the Connect Your Banks and Credit Cards screen. Log in and then Quickbooks Self-Employed will automatically download 90 days of transactions for you. This feature works for both credit card accounts and bank accounts and should be set up for any account that you use in your business.
A Quick Note on Importing Transaction History – If you’ve been in business longer than three months, simply download your transactions in a CSV file from your bank. You’ll see an Import Transactions option, which will guide you through the steps you need to take to include those transactions in with the rest of your accounting data.
Step 2: Set up categories and rules
Now you make it easy to allocate each transaction by creating categories and rules. It’s important to note that you can opt to keep certain items as Personal so they don’t affect your business accounts.
You’ll find an Add Rule button next to each transaction. Pick the appropriate Income or Expense category, which the software will then apply to future similar transactions.
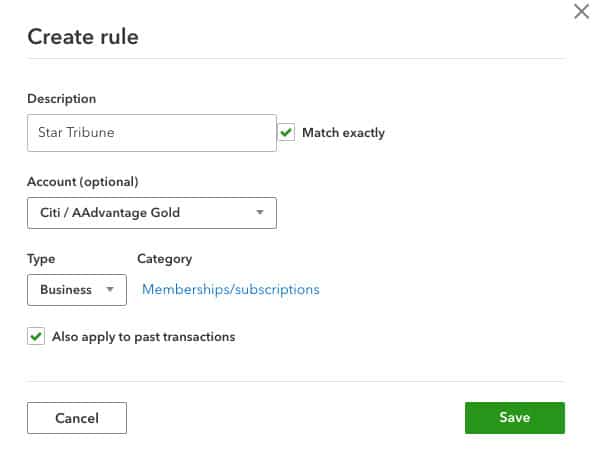
When setting this up, be sure to check the box next to Also Apply to Past Transactions. Now Quickbooks Self-Employed will apply this to all your imported, historical business transactions so that you don’t have to do it manually.
Step 3: Download QuickBooks Self-Employed mobile app
Download the Android or iOS app onto your smartphone so you can manage almost everything from there. The app’s automatic mileage tracker feature is particularly useful if mileage tracking is important for your line of work.
Step 4: Manage your miles
In conjunction with the app, you can easily track mileage on all your business-related trips. This is why Quickbooks Self-Employed is such a handy accounting setup for Uber drivers. On each trip, simply select whether it’s for business or personal use. The app will then track your trip distances.
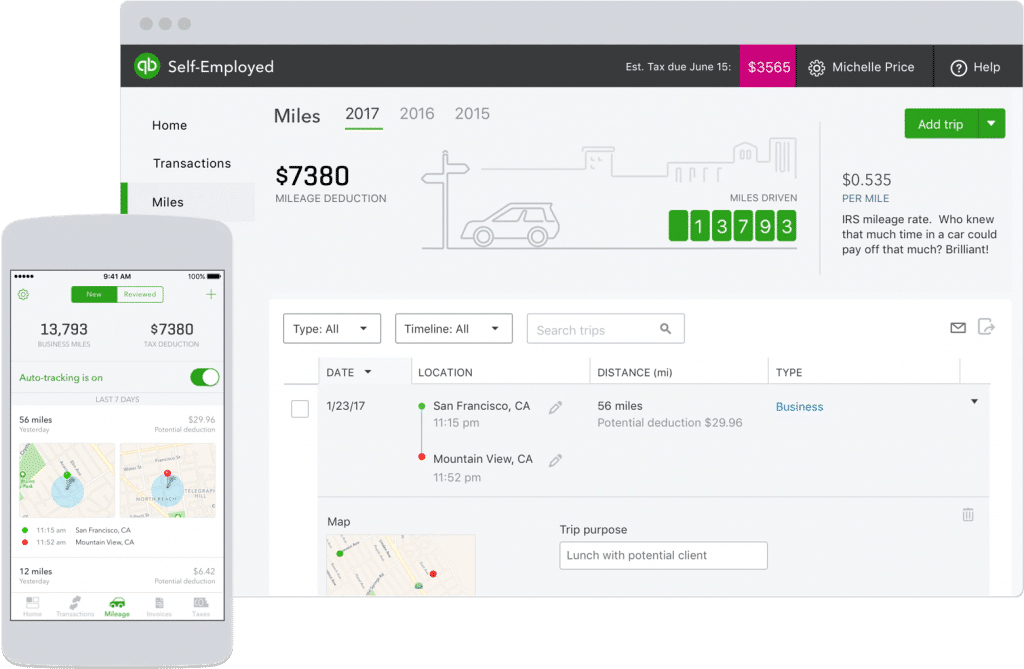
You can also enter business mileage details manually if you prefer.
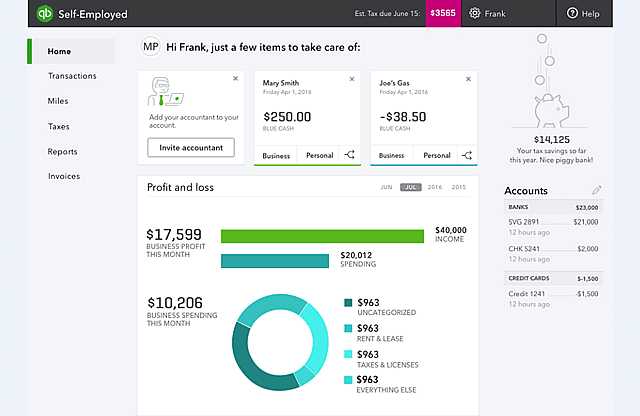
Step 5: Stay on top of your taxes
Quickbooks Online is designed to help you monitor your tax payments, and make tax filing easier. As you allocate income and expenses and subtract tax deductions, the dashboard shows you what your estimated tax payment will be. You’ll always be able to find this total in the top right corner.
During setup, Quickbooks Self-Employed will ask relevant personal details to calculate your tax liability, such as marital status and tax-free allowances.
Step 6: Invoices
Quickbooks Self-Employed allows you to send invoices to clients, if necessary. Simply use the Create Invoice tab. For first time clients, you’ll have to enter details manually, but the software will have autofill features for those that are recurring.
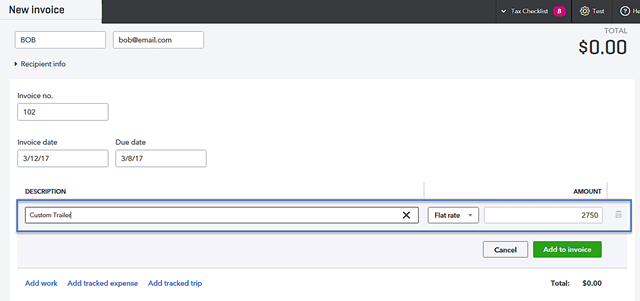
Important Note: You can mark an invoice as paid, but this won’t automatically be allocated to your Profit and Loss statement. You must still add the transaction manually.
How to separate business & personal finance with QuickBooks Self-Employed
When you’re self-employed, it’s very important to keep personal expenses and business expenses as separate as possible. That way, you can deduct every true business expense, without worrying about muddying the waters. QuickBooks helps you separate expenses, making things much easier come tax season. It’s even easier if you bundle QB Self-Employed with tax software like TurboTax.
The software has a split feature so you can break up one transaction and allocate it to separate business and personal accounts. This helps if one purchase included items for both personal and business use, which is a very practical feature since you can type in specific amounts or use the percentage function.
![]()
Also, during the initial set up, the best way to separate business finances from personal finances is to simply not add personal accounts to QuickBooks. For example, you likely have a business checking account and a personal checking account. If you only add your business account to QuickBooks, you’ll only track business transactions, keeping your tax details much more clean.
How to create a Schedule C category in QuickBooks
Sole Proprietors are required to fill out a Schedule C when filing tax returns. You can’t create or customize a new category in Quickbooks Self-Employed, but it does come standard with relevant options already loaded. These align with IRS Schedule C requirements, which makes it easier to keep track of eventual tax payments and customize your tax profile. This category can cover:
- Business income for all money earned
- Business expenses which can be allocated to accounts, including:
- Rent and lease
- Vehicle repairs
- Business loan
- Wash and road services
- Personal spending (separates personal finance)
There’s also a user-friendly search tool to help you find the right account for each expense on your bank statement.
Learn more about QuickBooks Self-Employed
- QuickBooks Self-Employed vs QuickBooks Online
- QuickBooks Self-Employed video tutorials, directly from Intuit
- QuickBooks Shortcuts and Tips
Additionally, you can always contact Intuit customer support with any questions you may have.